Git Started
You've got your software installed? Great! Now what? You can try the basics of working with git by creating a simple repository (repo) project as your personal "training ground".
For this walkthrough, you will need a text editor to work with the content of your repo; I'm going to assume that you have installed Visual Studio Code.
git Setup
Every git repo should have a couple of key files present:
.gitignore- to identify files/folders whose content you do not want to track in your repository..gitattributes- to smooth out the subtle differences that can occur when using text-based files on different operating systems.
The contents of the .gitignore file will differ gretly based upon the kinds of files you will be working with in your repo. A great location to generate your .gitignore file is gitignore.io. Likewise, you can go to gitattributes.io to generate the content for your .gitattributes file. For our purposes, I'll show you the minimal content you need for these two files.
Note
Strictly speaking, you don't have to have these files; but you will save yourself a lot of grief if you automatically include these right away whenever you create a new repository.
Create an empty folder on your computer as the location of your new git repo.
In Visual Studio Code, choose File → Open Folder… and select the folder that you created.

Next, choose File → New File to create a new file and give it the name
.gitignore(note the period in front of the file name).
Depending on your operating system (Windows vs Mac OS), enter the following in your
.gitignorefile.Windows
### Windows ###
# Windows thumbnail cache files
Thumbs.db

# Folder config file
[Dd]esktop.ini

# Recycle Bin used on file shares
$RECYCLE.BIN/

# Windows shortcuts
*.lnk
Mac OS
### macOS ###
# General
.DS_Store
.AppleDouble
.LSOverride

# Icon must end with two \r
Icon

# Thumbnails
._*
Once again, choose File → New File to create a new file and give it the name
.gitattributes(note the period in front of the file name). Give it the following content.# Auto detect text files and perform line-feed (LF) normalization * text=auto
init and commit
At this point, we have some files and a folder for our repo. It's not actually a git repository yet, however. To make it a repo we have to initialize the folder. Then, we can commit our new files as the first "snapshot" of our repository's content. You can do this in various ways, depending on the tools you've installed.
Initializing in Visual Studio Code
Select the "source control" tab -
 - and click on the Initialize button to set up your folder as a git repository.
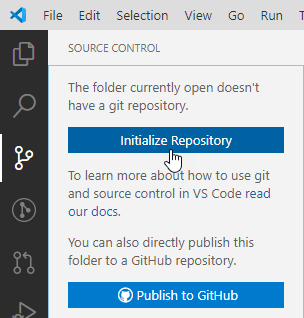
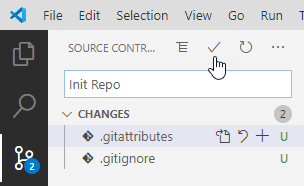
Next, enter a short message about your first commit and click the checkmark to commit the changes.
Adding a ReadMe.md
After starting your repository with your first commit, you can add more files. A good place to start is with a README file. Repositories typically include a ReadMe.md to let others know what the repository is all about.
Create a new file in your repo and call it
ReadMe.md- This is a Markdown file.Enter in some content using Markdown formatting syntax. Here's some sample content to get you started.
# About This Repo

This is my first repo and I am **very excited** about learning about git repositories! I created this through the tutorial at [LearnDVCS](https://learndvcs.github.io/GitStarted/).
Click the source control tab -
- and commit this new file.
From this point on, it's just a matter of "Rinse & Repeat": You can edit your existing files and/or create more files, making commits whenever you want to save the latest "snapshot" of your changes.
Having a repository on your computer is just the beginning. The next step in your journey is to publish your repository online, so that you can share it with others and access it from anywhere.